Click here to learn how to make an extra $5-$10 per online paid survey.

Pretty Clipboard

20 comments

If you're new here, you may want to subscribe to my RSS feed. Thanks for visiting!

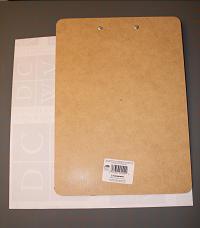
My church operates on a volunteer basis - no one is paid for their service in any position. I was recently asked to be the secretary for our women’s organization called Relief Society, and since I needed a clipboard, I picked up a cheap one from Walmart and gave it a little Mod Podge makeover.

Mod Podge is a great supply for your craft room because it makes decorative makeover-ing super easy. You could spruce up a clipboard, wooden picture frame, lamps, table tops, or kid’s bookshelves. I actually have some lamps I picked up at a garage sale for $1 a piece that I plan on making over.

To begin, pick a pretty piece of paper, wallpaper, photo, magazine page, page out of a book, anything. Spread glue all over the surface of your clipboard - do it quickly before it dries.

mod podge clipboard project

I lined up one edge of the paper with one edge of the clipboard and let the other edges hang off. After you rub down the paper with a bone folder to make sure it sticks really good, flip the clipboard over and cut the excess paper off along the edges of the clipboard using an X-acto knife. You’ll have to hang the top edge of the clipboard off the able so it lies flat.

I lined the top of the paper up with the bottom of the metal clip and then patched the corners.

With a paintbrush, give the surface of the clipboard several coats of Mod Podge, waiting 15-20 minutes in between coats.

mod podge clipboard project

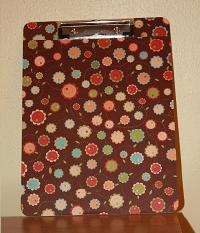
Voila! All finished. When I get tired of this pattern, I’ll either get another $.99 clipboard or cover it up with something else.

I did have a problem with the paper bubbling because my glue had dried a bit. Next time I will maybe cut my paper into two sections and glue half at a time. You will barely be able to see the seamline and that will prevent bubbling.

This was a fun project that took about a half hour, excluding the glue drying wait times. I can’t wait to find something else to Mod Podge!

Share and Enjoy:
  • Digg
  • del.icio.us
  • Furl
  • Reddit
StumbleUpon It!
add to kirtsy

Related Posts

RSS feed | Trackback URI

20 Comments »

Comment by Jeri
2008-09-17 01:15:22

I glue the paper down with the ModPodge, wait for it to dry and then apply it to the surface. Sometimes I get lucky and it doesn’t bubble. It seems like if I’m more patient and don’t soak the paper with the glue, I can keep it flat.

 
Comment by Jennifer
2008-09-17 05:29:09

I love this idea and have been saying for a while I’ve been wanting to try it but have yet to! I love the way they turn out!

 
Comment by emilyt
2008-09-17 06:43:52

Cute! I’ve never played with Modge Podge but it looks fun and sounds easy enough. Good luck in your new appt.!

 
Comment by Nicki Lundeen
2008-09-17 07:27:06

This is cute idea - they are also great to hold photos or scrapbook pages and then you change them out periodically. Thanks for sharing!

 
Comment by Baba
2008-09-17 08:41:57

We use a lot of Modpodge at our house for just things like this! Great product and great idea for using it.

 
Comment by Lisa Jamerson
2008-09-17 09:15:20

I take a roller OR ruler and smooth out the bubbles right after I glue it down. Eliminates those bubbles!

 
Comment by TLC
2008-09-17 10:22:00

Your clip board turned out so cute! Good luck in your new calling!

 
Comment by Sharla
2008-09-17 10:45:12

I love mod podge too! I’ve used it on clipboards, tins, and boxes. We’re doing an enrichment activity at RS tonight decorating hat boxes with halloween characters to put candy in. I”ll post pictures on my blog tomorrow!

 
Comment by subu
2008-09-17 10:55:03

i love the idea. i have been meaning to do this so i have a cute clipboard to keep with me at craft shows…you have definitely inspired me to get some mod podge and get going!

 
Comment by Becky Smith
2008-09-17 14:25:25

I love Modge Podge! One thing that I have used it for recently was to hold together a puzzle that I really liked (and matched our kitchen!). Once I put the modge podge on both sides and let it dry, I hot glued some rope around it to make a frame. It turned out really cute. My next project using it will be to make a magnet board.

 
Comment by Pam
2008-09-18 06:51:18

Goodness! That would be GREAT for passing around my signups at Relief Society! (I am the Enrichment Activities Committee Leader) Thanks for the idea!

 
Comment by Amy Rhoads
2008-09-18 11:04:18

Hey I never gave thought to having a cute clipboard, buy hey!! I do!! We are doing our kitchen in a western rustic feel and I have some scrap paper that would be perfect for it and then I could hang that up for either our grocery list or our message board. Thanks!

 
Comment by Casey Toney
2008-09-18 20:01:54

I am not a big fan of the covered clipboard…but I like the usablity and simpleness of this! Great job Kelsey!

 
Comment by syeda
2008-09-20 08:35:33

I should say the clipboard looks dainty. I have never tried Mod Podge glue. But there are so many things you can do with it. I think I am going to buy it next time I out for shopping.

 
Comment by Sue D
2008-09-20 19:09:13

This has been something I’ve been meaning to try but most I have seen don’t look like you could use them. Yours is meant to be used so I think I will give it a shot.

 
2008-09-22 07:15:50

I just stumbled across your blog and wanted to say hi! I’ve been making really fun clipboards too. I’m hoping to sell them at an upcoming craft fair, but we’ll see. You should come on over to The American Homemaker and check them out. Have a good day!

 
Comment by Michelle Baucum
2008-09-22 08:45:31

That’s so cute! Way to make a boring clipboard into an exciting and cute one!!!!!

 
Comment by Misty
2008-09-22 09:48:22

I am getting ready to try modge podge for my first time! I am excited. I thought overlapping coordinating papers and photo would be great for this project as well. Thanks for sharing!

 
Comment by Wendy Lust
2008-09-22 10:04:04

I use Mod Podge a lot also. I have been buying wood trays on clearance and then making personalized gifts with them. I’ve made wedding gifts using the couple’s wedding invitation, a wedding photo, die cuts and other sentimental items. Mod Podge holds everything securly and also puts a good finish on the completed tray.

 
Comment by Jessica
2008-09-23 17:37:36

you could use a few patterned papers so that the cut lines really blend.
good luck being R.S. sec! i am primary pres. and ready for a release soon (which probably won’t happen :-)

 
Name (required)
E-mail (required - never shown publicly)
URI
Your Comment (smaller size | larger size)
You may use <a href="" title=""> <abbr title=""> <acronym title=""> <b> <blockquote cite=""> <cite> <code> <del datetime=""> <em> <i> <q cite=""> <strike> <strong> in your comment.
Family Fun